Photoshop overlays are about adding texture to your photographs. The technique of applying textures to images was actually a common practice way before the invention of Photoshop. In the good ol’ days of film photography, we might have observed photographers staining or scratching their pictures with various substances and materials. This was done to give the photographs that little extra something to set them apart.
Back to our digital age, Photoshop overlays help us achieve stunning effects without having to get our hands dirty and risk damaging the image for good. Editing programs offer non-destructive means to play with your images and create unique works of art.

What are Photoshop Overlays?
When speaking of overlays, one usually refers to textures. Although we cannot perceive them by touch, textures can still be “felt” visually. In digital photography, overlays are a layer or multiple layers added to a picture. The overlay is usually another photo of a textural surface, but it doesn’t always have to. Even two portraits piled one on top of the other can create an overlay.
Why do we use textures? Because applying the right one, and doing it correctly for that matter, can give your image a whole new meaning. Depending on what you like, and your personality, you can make your picture look as vintage, serene, or grunge as you want.
Photoshop overlays are also a way through which we save a noisy or blurry picture and make it seem like it was intended to look that way.
How to Create a Texture in Photoshop
One of the simplest textures you can create in Photoshop is a wood texture. Here’s how.
Open a new document, choose a size (but make it a square), and set the color model to RGB or CMYK (if you want to print it). Set the resolution to 72 dpi if you want to use it for web. Now set the foreground and background colors to beige and brown (colors that resemble those of wood).
Then go to the menu bar and choose “Filter”>”Render”>”Fibers”. Play with the “Variance” and “Strenght” settings until you are happy with the result. Next, go to “Image”>”Image size” and double the size of the height.

To make your texture even more realistic, you can add wood knots. Pick up the elliptical marquee tool and make a few oval shaped selections. Now go to “Select”>”Modify selection”>”Feather” and place it at 30 pixels. The final stage is adding a twirl to create the knot. Go to “Distort”>”Twirl” and choose an angle of about 200 degrees. You’re done.
Using your new gained knowledge, you can now explore Photoshop’s menu and create other textures using the same principles.
How to Blend a Texture with a Picture in Photoshop
Now that you know how to create a texture, it is time to use it and create Photoshop overlays.
Open both your photograph and the texture in Photoshop and bring the texture into the image window. You can do that by going to the “Select” menu and choosing “All”. Now that you have the full texture selected, you can copy and paste it to the photo.
The program will add it to the document as a second layer sitting above your picture. If your texture is smaller than the photo, you can resize it by dragging its corners. Hold the Shift key while doing that to prevent your texture from distorting (although it really doesn’t matter if the texture gets a little distorted).
It is time to move on to the ”Blend Mode” option, which can be found in the Layers panel. It is set to “Normal” by default, meaning that your texture is not blending with the picture in any way. When you click the box, you will get a list of blend modes to choose from. Select each mode at a time and see what fits best. If the texture is too intense, you can make it more discreet by lowering the opacity. The “Opacity” option is right next to the “Blend Mode”. You can lower the value to have your two layers blending in a much subtle way.
Ultimately, you can add filters from the “Filter” menu to the image to refine the look.
Where to Find Free Overlays for Photoshop
Creating your own texture can be time-consuming, and you may not be so pleased with your work if new to the software. Luckily, many websites are offering free Photoshop overlays.
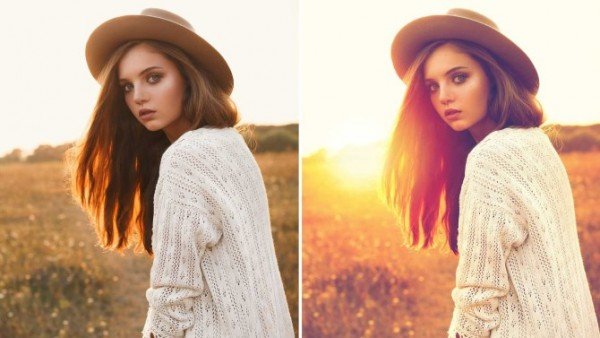
Brusheezy offers many resources for Photoshop, such as free brushes, patterns, textures, and graphics. You can find plenty of images that can turn your photo from ordinary to extraordinary. What we enjoyed the most is this pack with flare and haze textures that add a dreamy-like feeling to your images. You just have to drag and drop the texture over your picture, and scale and transform the texture so that it fits your image. Then, just change the blending mode to “Screen” for the optimal result and adjust the opacity.
PhotographyPlanet provides a wide range of overlays for Photoshop, especially if you are into putting text over your pictures. You can find overlays for pretty much every major event in your life: wedding, birth, graduation, engagement, and more. Most of them are not free, the prices ranging from $19 to $29 for packs of 10, 20, or 30 overlays.
But there’s a way to sample their products by subscribing with your email address. Click here and get your hands on the free photography bundle.
Designrfix offers almost 600 free patterns, textures, and backgrounds to its users. You can find many wood, leather, fabric and paper patterns, among others, to add to your creations. As for the backgrounds, they range from vintage to geometric and paint splashes. All you need to do is subscribe to their newsletter, and you will be sent the download link to the sets via email.
Spark it up with this bundle of 60 sets of gradients that you can use to add a spectacular effect to your images. You can choose anything from the clean gradients set to vintage, sky, landscape, pastel, and even bokeh gradients. The sets are put together by artists on deviantart.com, and you can download the .zip files free of charge.